ETH Staking Validator
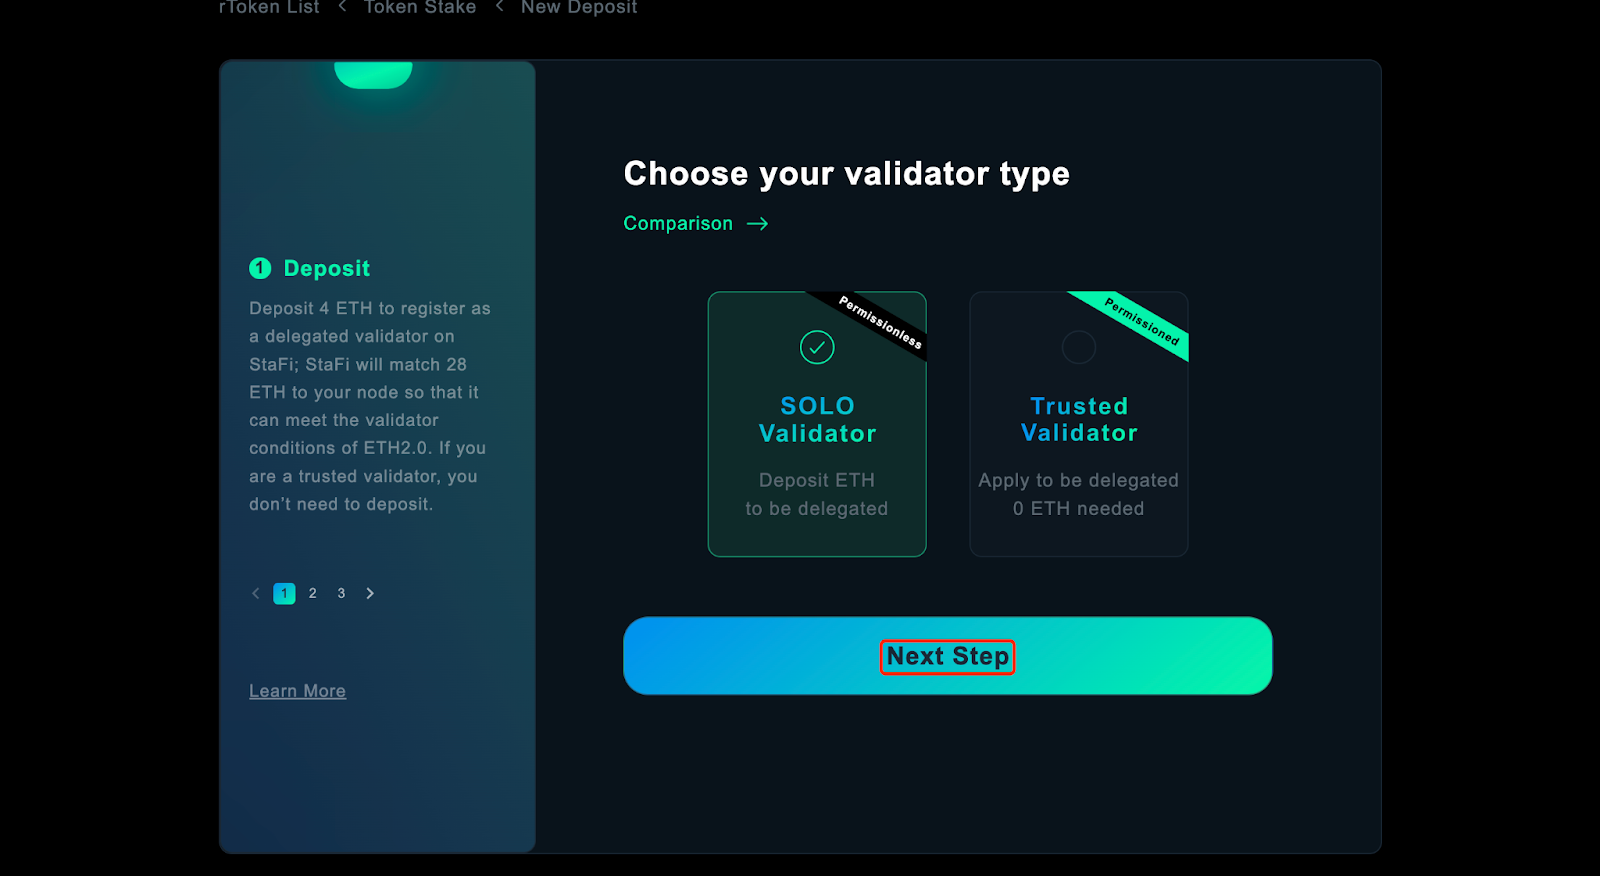
StaFi ETH staking supports two types of validators: solo validators and trust validators. Solo validators are permissionless, which means that anyone can deposit 12 ETH and run a node to become a solo validator.
The comparison between Solo Validator and Trusted Validator:
| Type | Self-deposited | Allocation from StaFi | Permission |
|---|---|---|---|
| Solo Validator | 12 ETH | 20 ETH | Permissionless |
| Trusted Validator | 0 ETH | 32 ETH | Permissioned |
How to become a solo validator
Go to validator page
Go to the ETH staking validator page (opens in a new tab) and select solo validator.
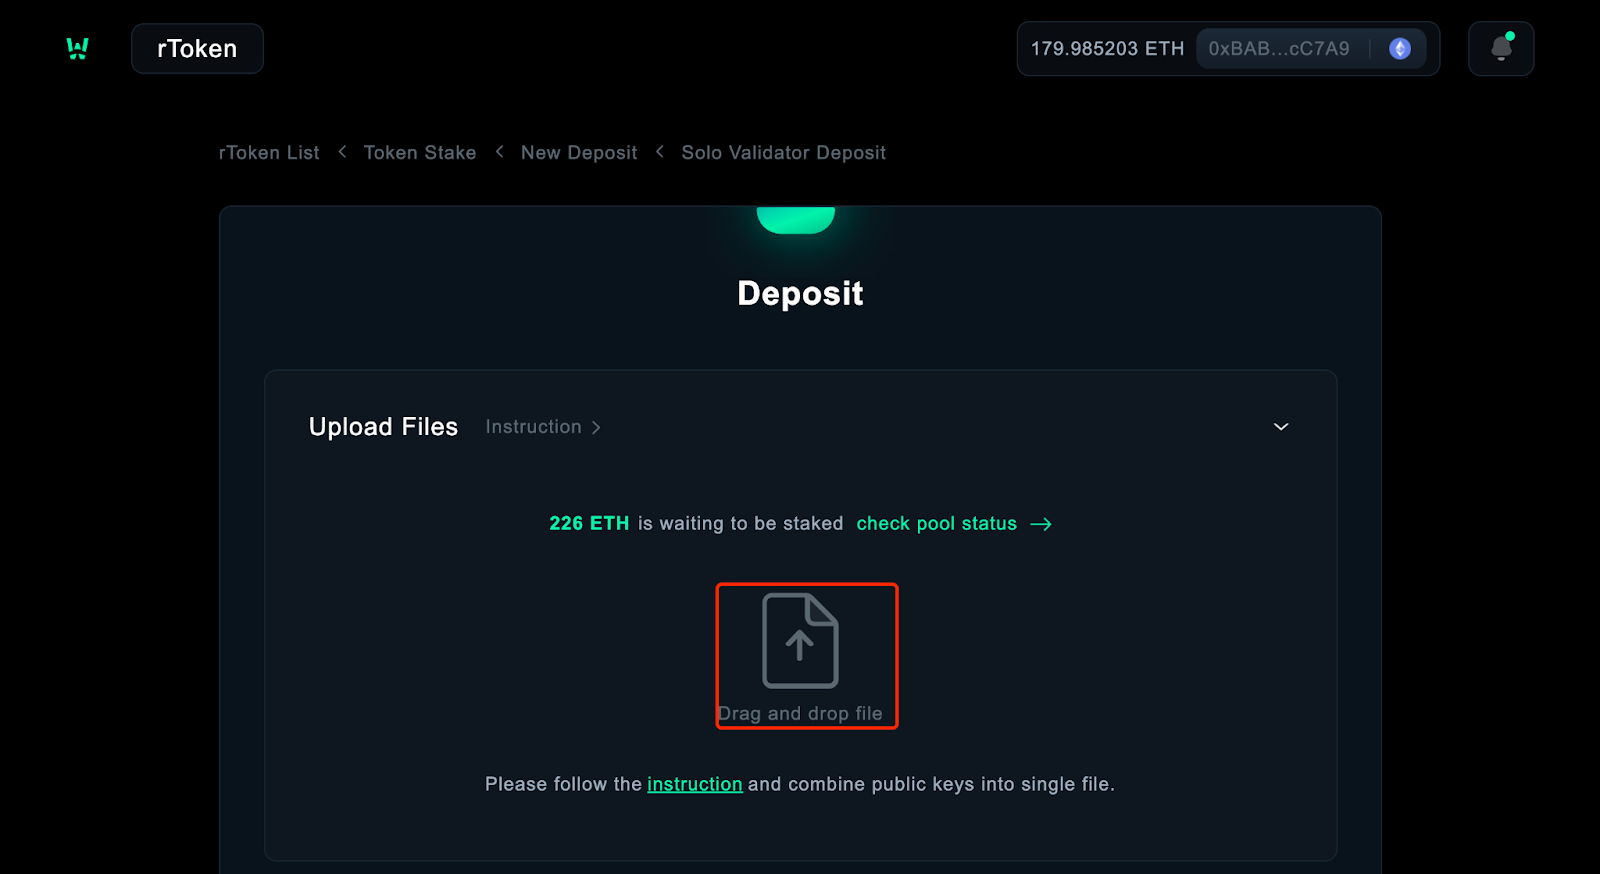
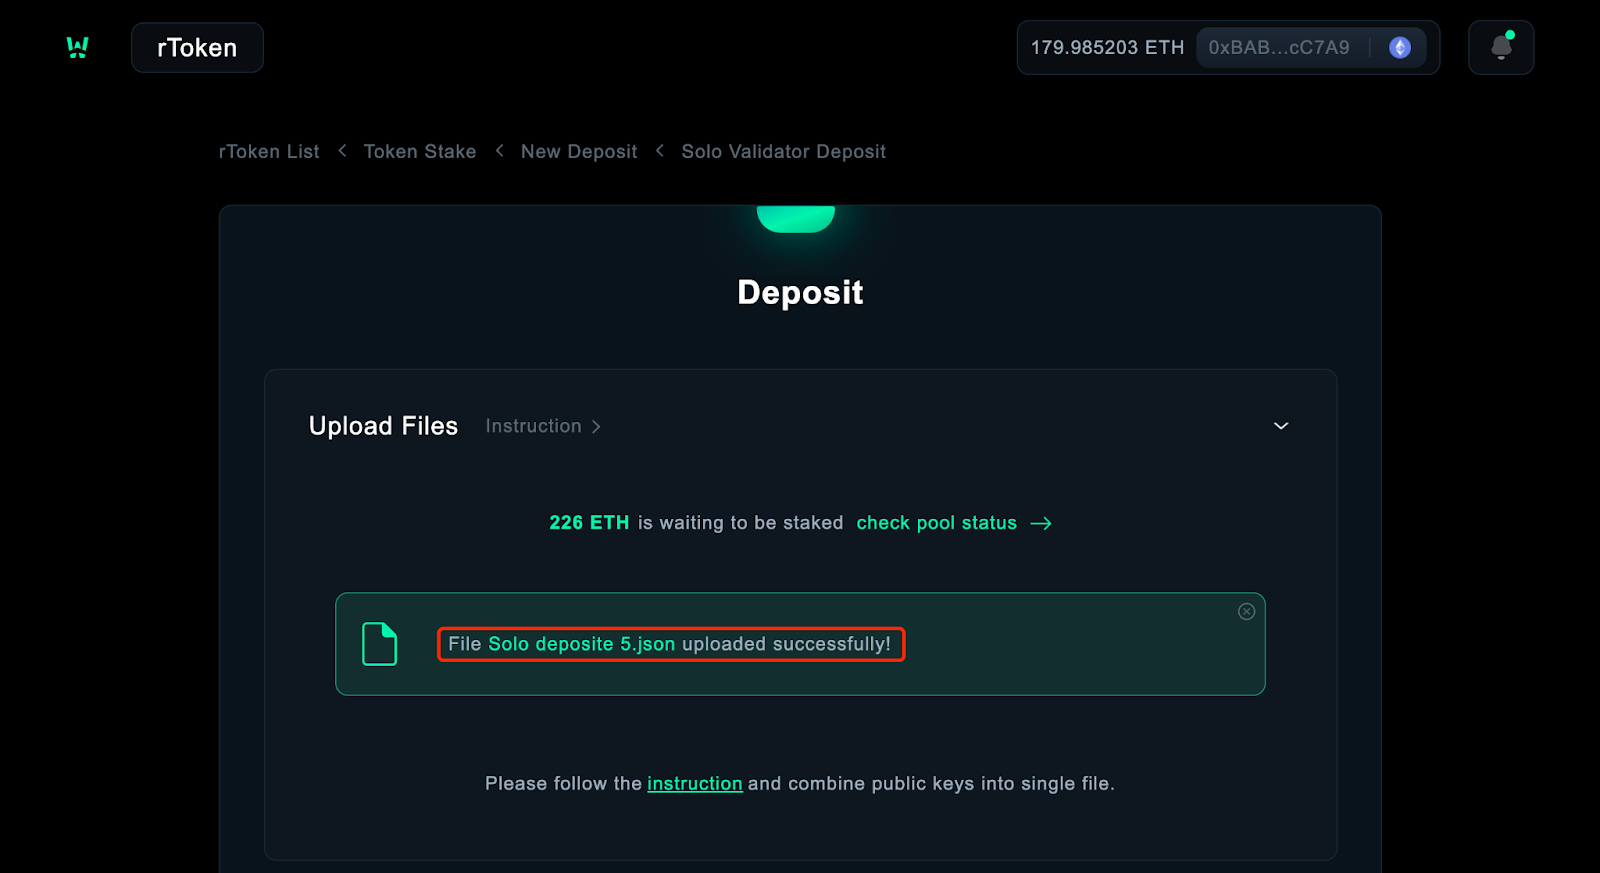
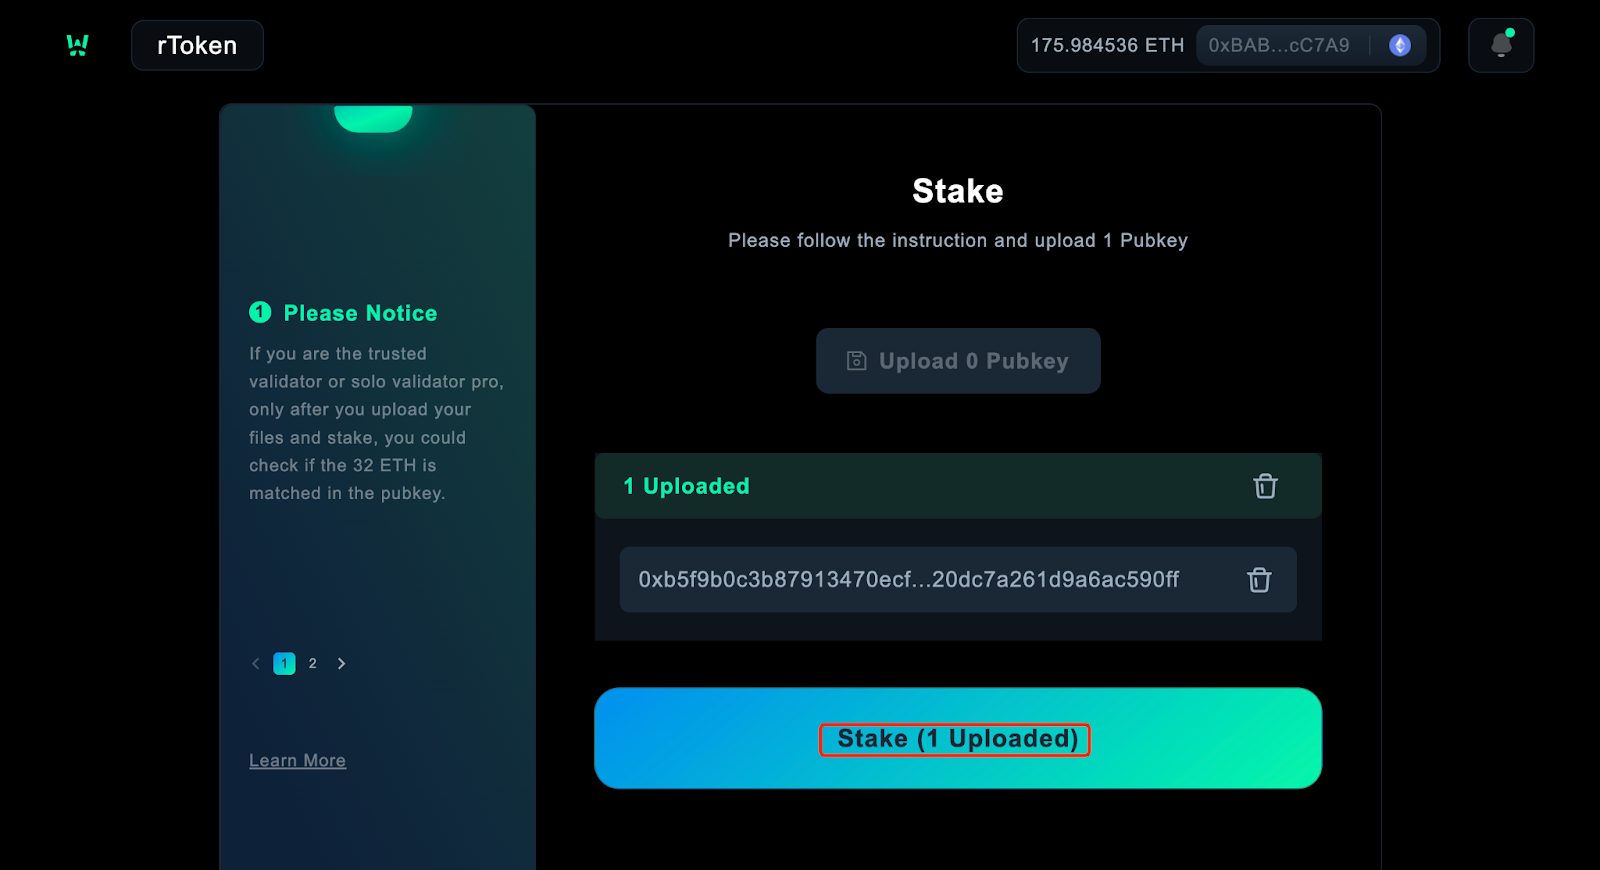
Upload deposit file
Enter the “Deposit” page, upload the deposit file(deposit_data-*.json) obtained in step 1, then you will see “File uploaded successfully ”.
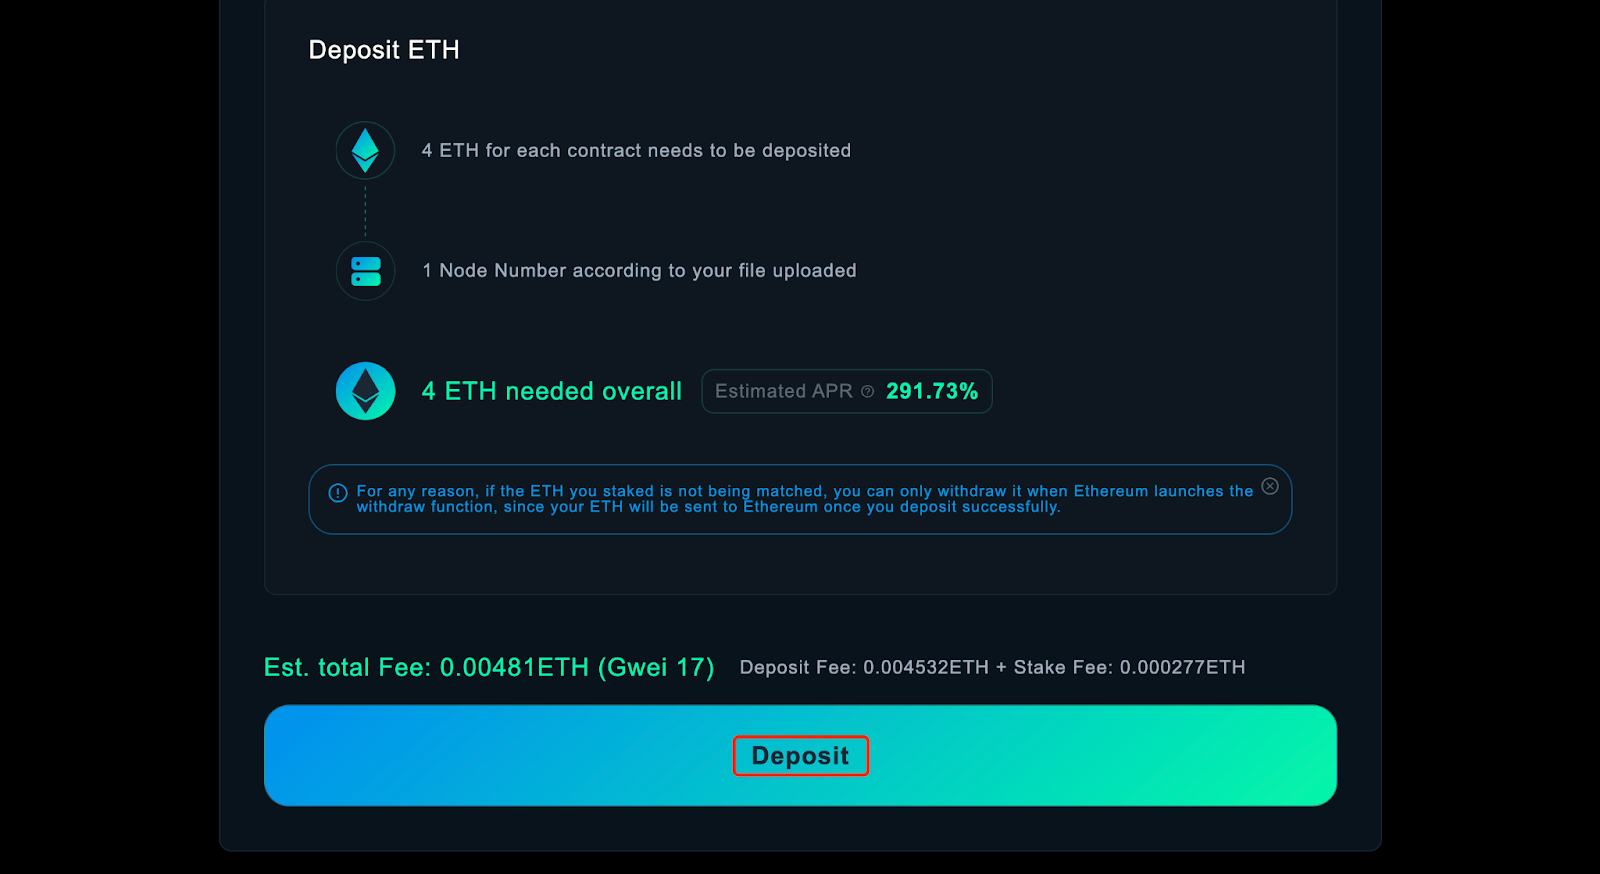
Deposit ETH
Click ”Deposit”(Please make sure you have enough ETH in your node address), the checking process may take 5 minutes, please wait a moment.
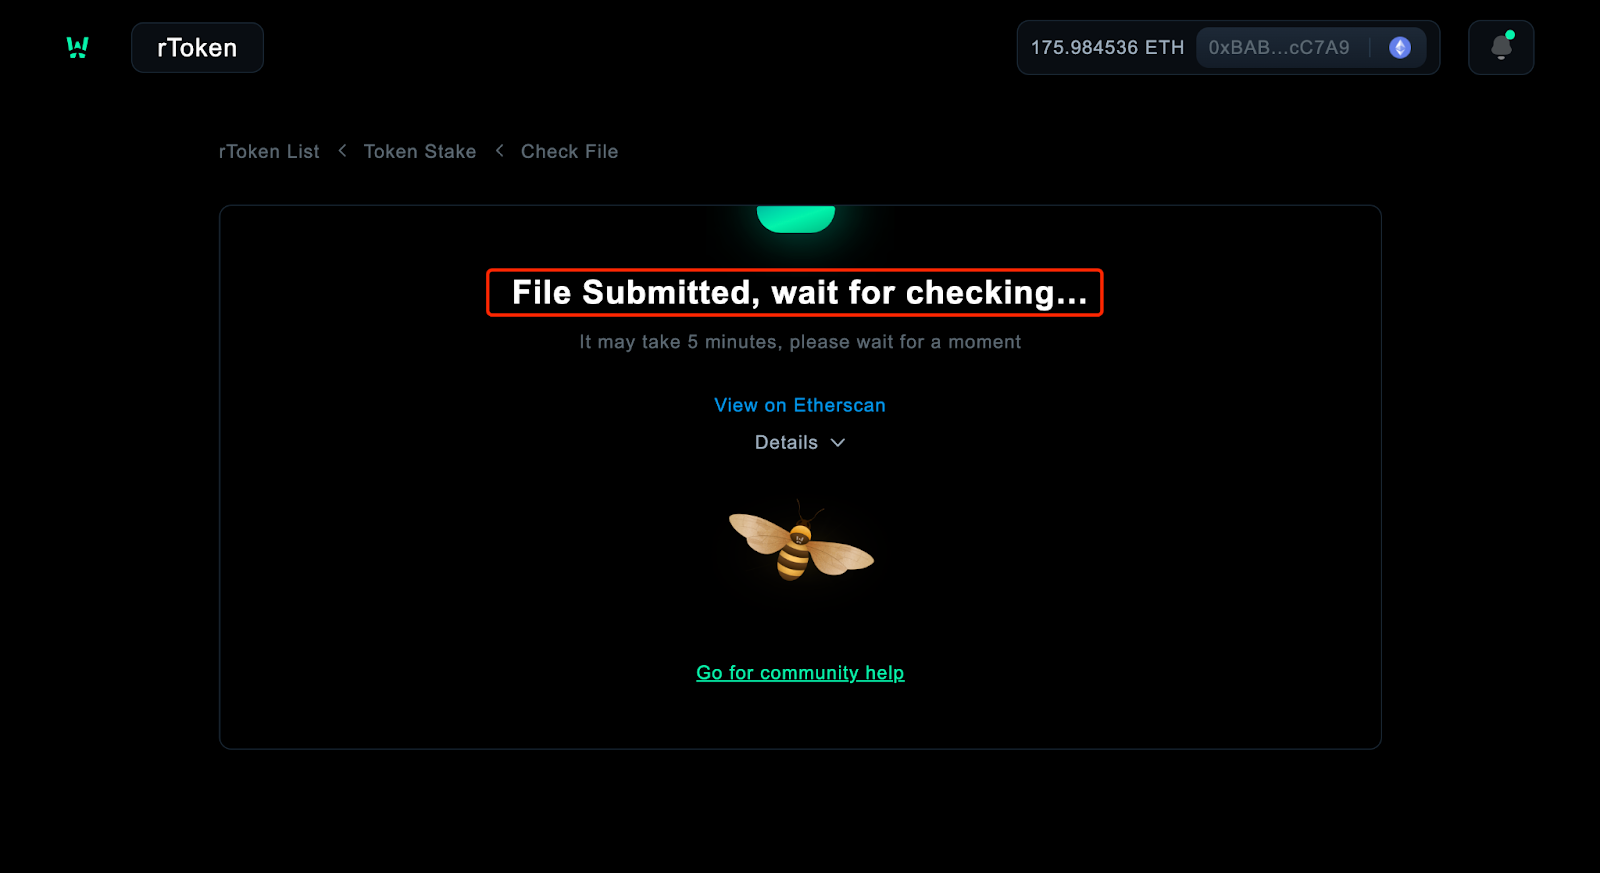
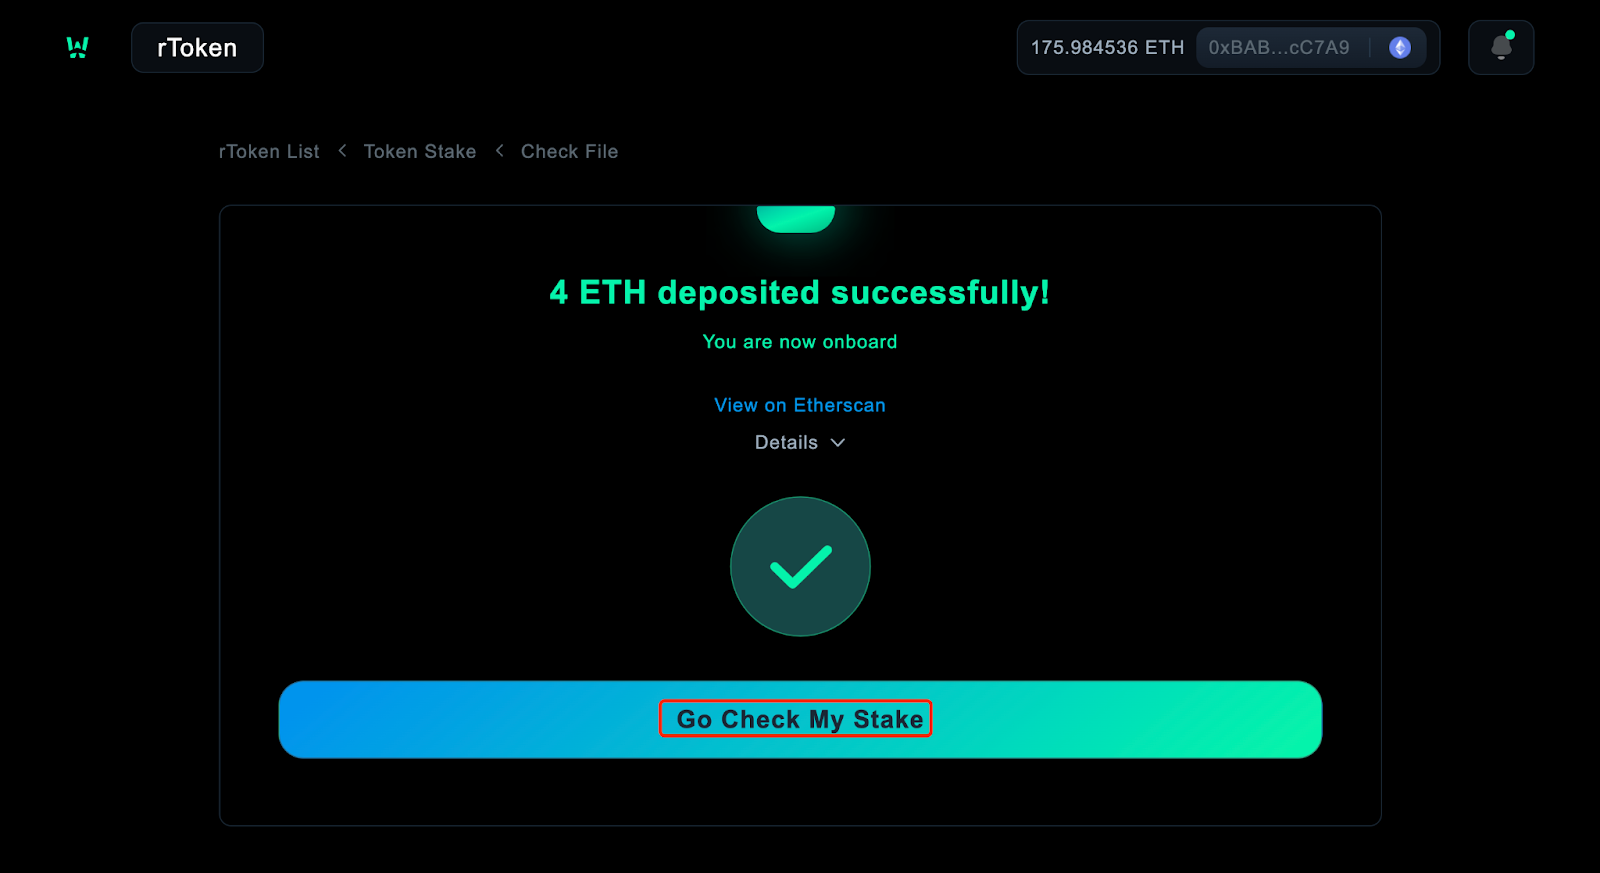
Wait for complement
Click “Go Check My Stake” after ETH deposited successfully.
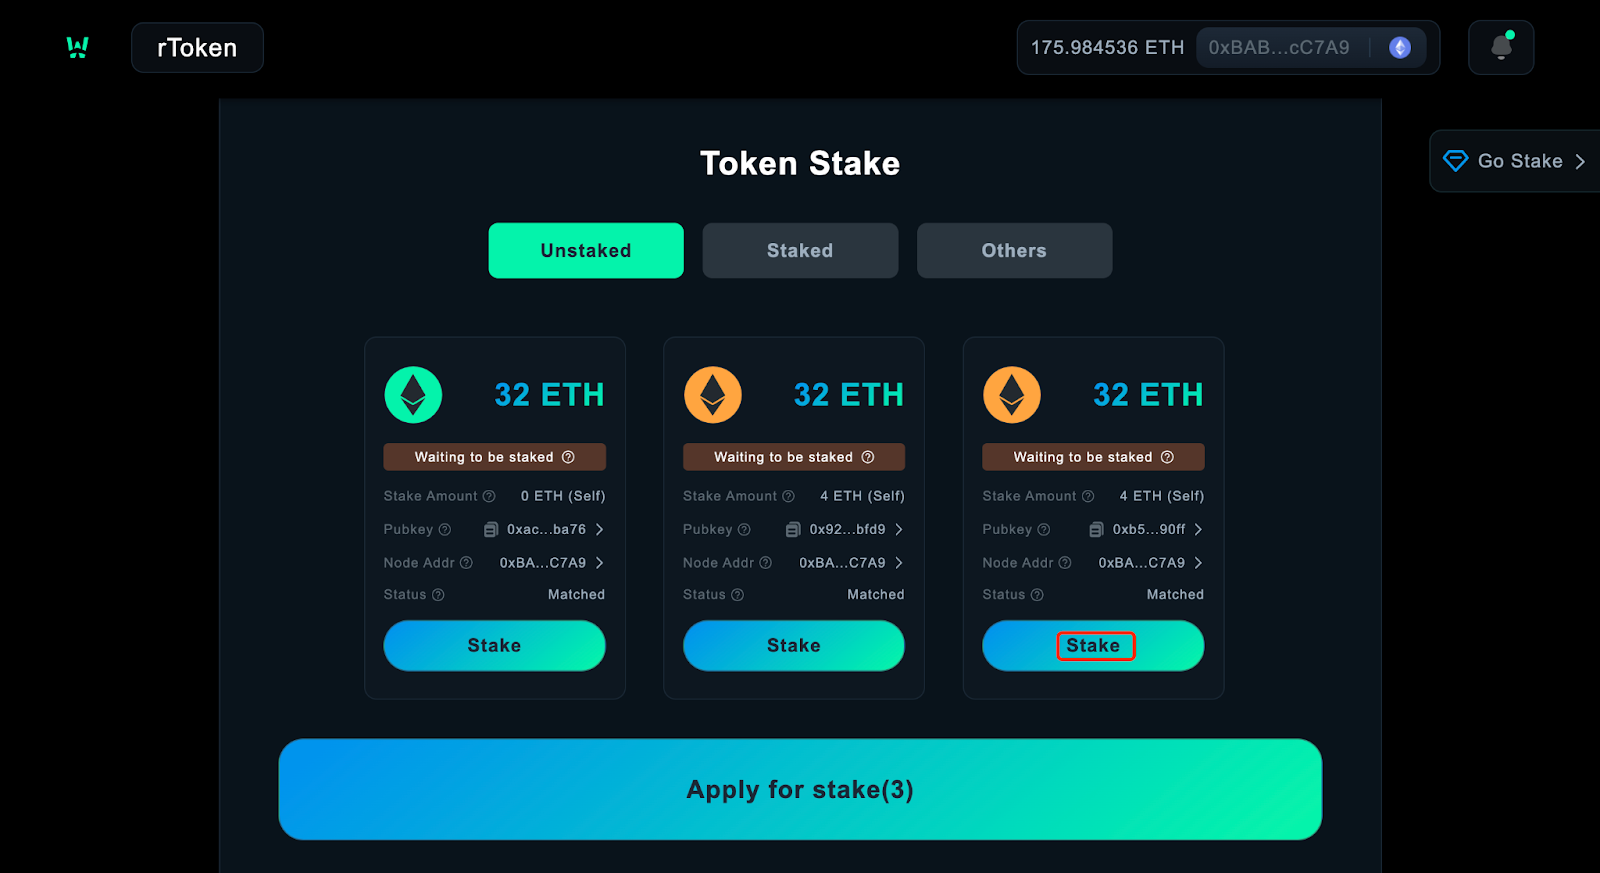
Select Pool
Your self-deposited ETH has matched 20 ETH in the pool, click “Apply for Stake” to stake 32 ETH.
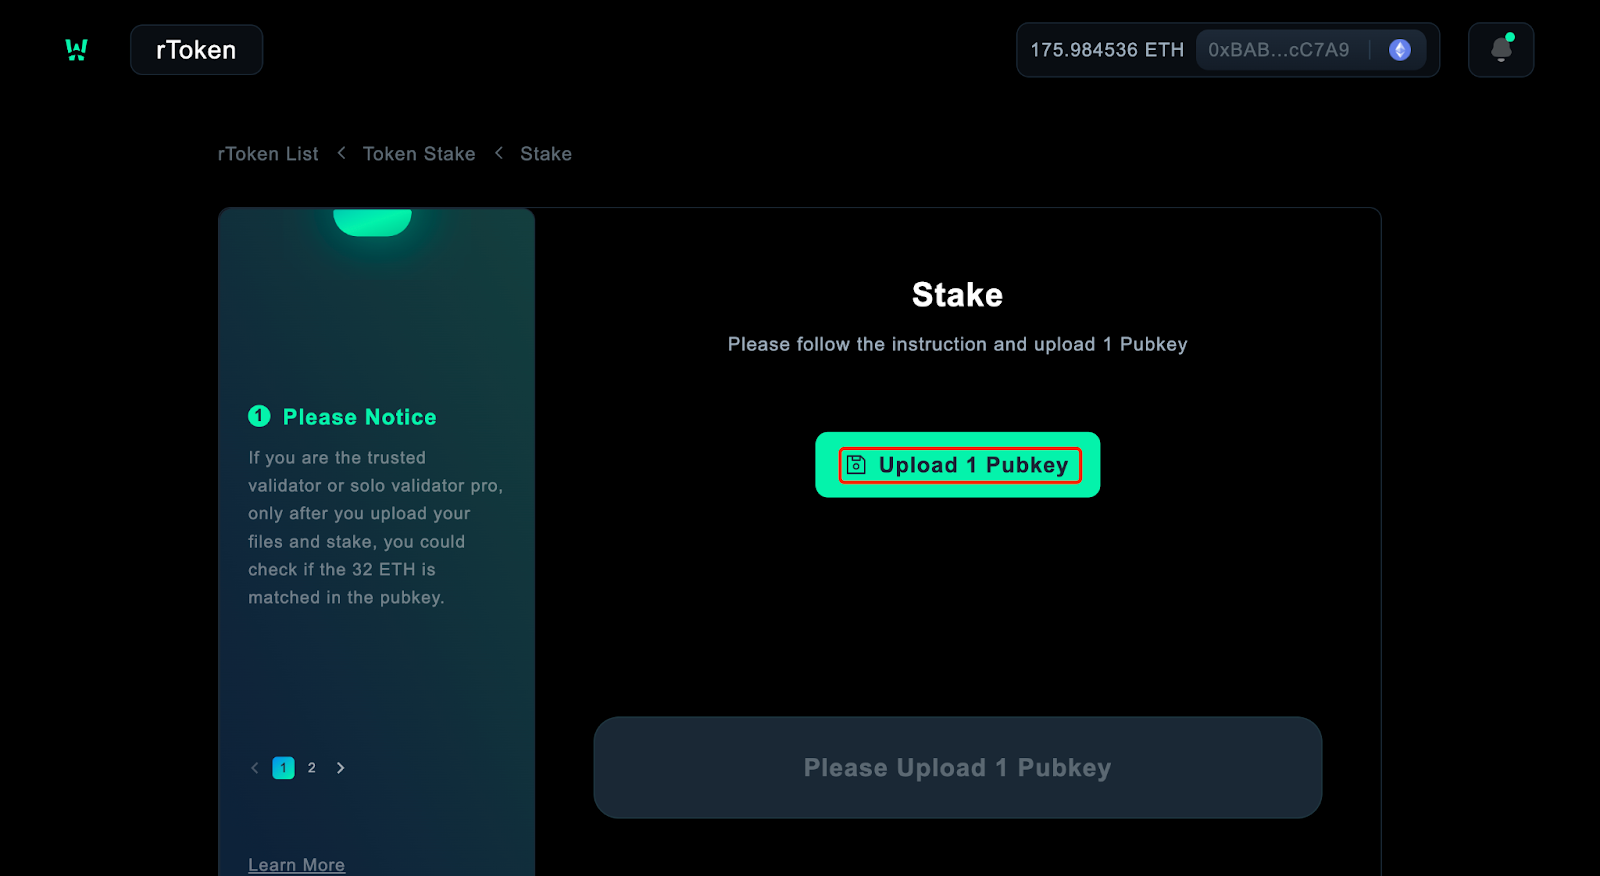
Update the file
Upload the stake file(stake_data-*.json) gotten in step 1.
Check data
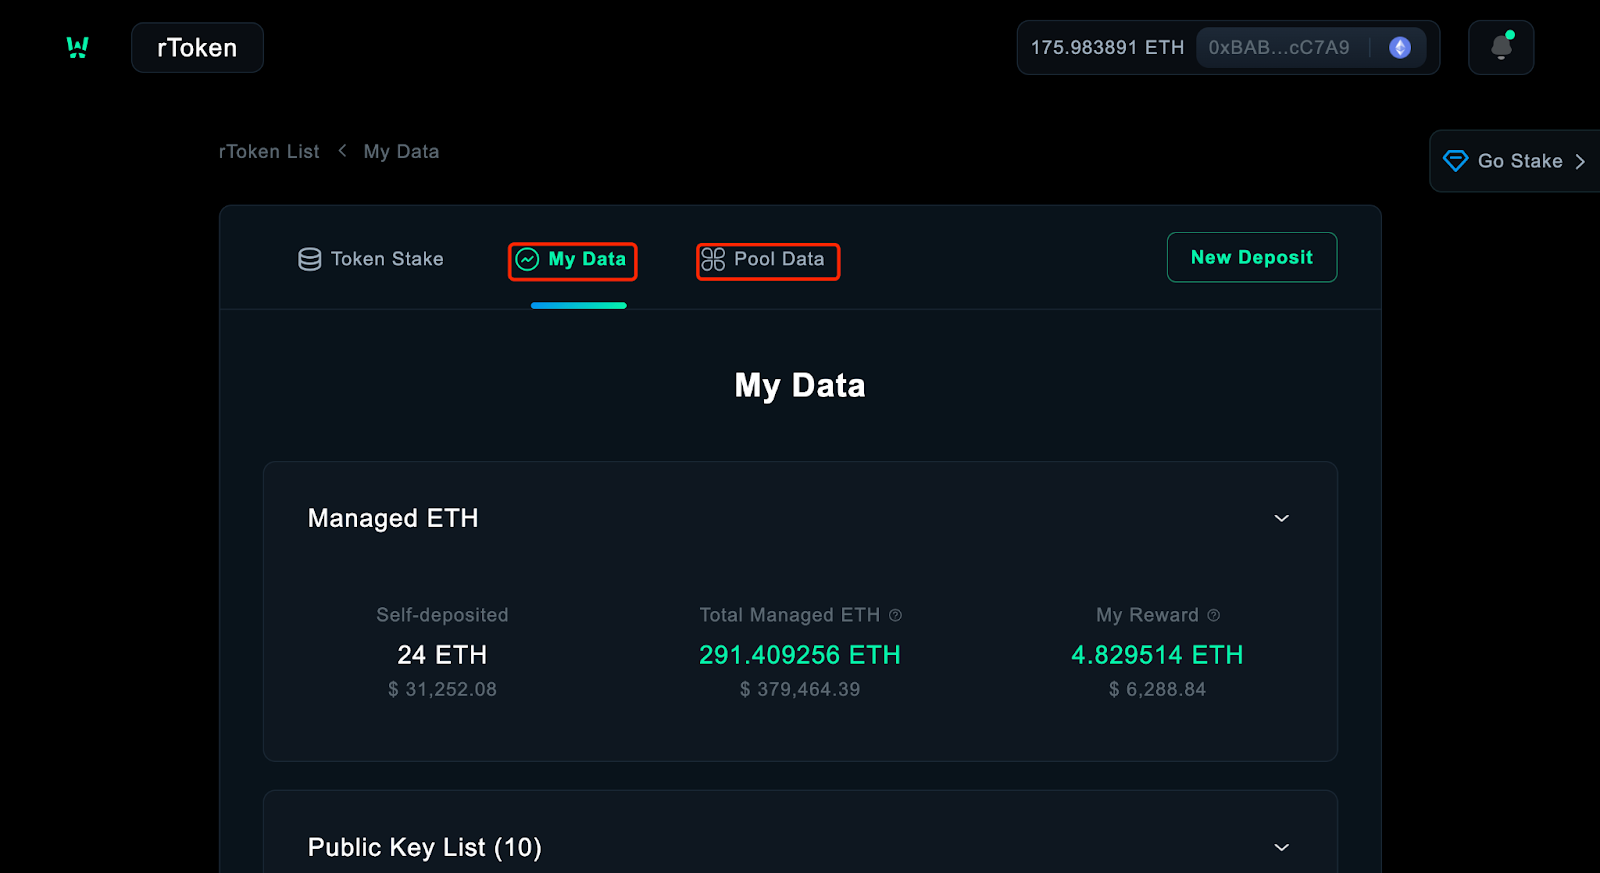
You can check “Managed ETH, Public key List Rewards, Reward Details” in “My Data page” and check the pool data in the “Pool Data”page after 32 ETH staked successfully.
Use deposit-cli to generate a key file
deposit-cli is a tool for creating EIP-2335 format BLS12-381 keystores and a corresponding deposit_data-*.json file and stake_data-*.json file for Ethereum 2.0 Launchpad.
Please generate your keystores on your own safe, completely offline device, and backup your mnemonic, keystores, and password securely.
Github: https://github.com/stafiprotocol/eth2.0-deposit-cli (opens in a new tab)
You should use master branch, please make sure to switch tomaster branch. git checkout master. And The mainnet does not support windows yet. Please use Linux or Macos or build with native Python
Install
Intel Chips
wget https://raw.githubusercontent.com/stafiprotocol/stafi-bootstrap/master/eth2.0-deposit-cli/binary/mainnet/macos/deposit-darwin-amd64.tar.gz
tar zxvf deposit-darwin-amd64.tar.gz
M1 Chips
wget https://raw.githubusercontent.com/stafiprotocol/stafi-bootstrap/master/eth2.0-deposit-cli/binary/mainnet/macos/deposit-darwin-arm64.tar.gz
tar zxvf deposit-darwin-arm64.tar.gz
Create keys and json files
If you want to run multiple validators one time. Just change --num_validators to the number you want. But for trust validators, the number is limited to a maximum of 50.
./deposit new-mnemonic --num_validators=1 --mnemonic_language=english --chain=mainnetYou will see the following messages after successfully generated the keystore(s) and the deposit(s):
Creating your keys:               [####################################]  <N>/<N>
Creating your keystores:          [####################################]  <N>/<N>
Creating your depositdata:        [####################################]  <N>/<N>
Verifying your keystores:         [####################################]  <N>/<N>
Verifying your deposits:          [####################################]  <N>/<N>

Success!
Your keys can be found at: <YOUR_FOLDER_PATH>
You could also build with Python to generate key and files. Python vesion need to be 3.7+.
Install
git clone https://github.com/stafiprotocol/eth2.0-deposit-cli.git

cd eth2.0-deposit-cli/ && git checkout master

./deposit.sh install
Create keys and json files
./deposit.sh new-mnemonic --num_validators=1 --mnemonic_language=english --chain=mainnetIn validator_keys directory, you can see the three newly generated files
- The deposit_data-*.json file must be uploaded when the validator deposit ETH
- The stake_data-*.json file must be uploaded when the validator stake
- The keystore-m*.json file is the information encrypted by the validator's private key. When validator runs the ETH2.0 client, it needs to be imported for voting or block signing.
Run a Node on ETH2 Mainnet
Run a node on ETH2 mainnet by Prysm
If you are a solo validator, please configure your fee recipient as 0x6fb2aa2443564d9430b9483b1a5eea13a522df45.
If you are a trust validator, please configure your fee recipient as 0xdc5a28885a1800b1435982954ee9b51d2a8d3bf0.
Otherwise you will be slashed by StaFi protocol. More details about the configuration, you can check here (opens in a new tab).
It may take hours or days for your validator to become fully activated. To learn more about the validator activation process, see Deposit Process. See Check node and validator status for detailed status monitoring guidance. In the meantime, leave your execution client, beacon node, and validator client terminal windows open and running; once your validator is activated, it will automatically begin proposing and validating blocks.
To check on the status of your validator, we recommend checking out the popular block explorers: beaconcha.in by Bitfly and beaconscan.com by the Etherscan team.
Run a node on ETH2 mainnet by Third-party service provider SSV
ssv.network is a fully decentralized, open-source ETH staking network, based on Secret Shared Validator (SSV) technology, which enables the distributed operation of an Ethereum validator. The SSV protocol splits a validator key into multiple KeyShares and distributes them to non-trusting nodes run by operators. The nodes execute the validator's duties under a consensus mechanism providing fault tolerance, increased security, and decentralized risk for stakers.
More details on SSV portal: https://ssv.network/ (opens in a new tab)
Run Ejector Client
The ETH validator running through the StaFi protocol needs to run the ejector client (opens in a new tab), which listens to events that require validators to exit. It will automatically send out an exit transaction when necessary.
Please make sure you will run this client after you run the validator node. If you are chosen to exit, you should exit your validator in 48 hours(Just keep running this client), otherwise you may be slashed by StaFi protocol.
Requirements
- Install Go 1.19+, for example:
cd $HOME
wget -O go1.19.2.linux-amd64.tar.gz https://go.dev/dl/go1.19.2.linux-amd64.tar.gz
rm -rf /usr/local/go && tar -C /usr/local -xzf go1.19.2.linux-amd64.tar.gz && rm go1.19.2.linux-amd64.tar.gz
echo 'export GOROOT=/usr/local/go' >> $HOME/.bashrc
echo 'export GOPATH=$HOME/go' >> $HOME/.bashrc
echo 'export GO111MODULE=on' >> $HOME/.bashrc
echo 'export PATH=$PATH:/usr/local/go/bin:$HOME/go/bin' >> $HOME/.bashrc && . $HOME/.bashrc
go version- Keystores generated by eth2.0-deposit-cli (opens in a new tab)
- Execution node RPC endpoint
- Consensus node RPC endpoint
Environment Variables
| Variable | Required | Example | Description |
|---|---|---|---|
| execution_endpoint | Yes | http://127.0.0.1:8545/ (opens in a new tab) | Ethereum Execution Node endpoint |
| consensus_endpoint | Yes | http://127.0.0.1:5051/ (opens in a new tab) | Ethereum Consensus Node endpoint |
| keys_dir | Yes | ~/validator_keys | Full path to your validator keys folder, which should include keystore-m_*.json files generated by eth2.0-deposit-cli (opens in a new tab) |
Execution Instructions
To run the client, follow these steps:
git clone https://github.com/stafiprotocol/eth-ejector.git
cd eth-ejector
git checkout <latest-release-tag>
make build
./build/eth-ejector start --keys_dir <PATH_TO_YOUR_KEYS_DIRECTORY> --consensus_endpoint <CONSENSUS_ENDPOINT_URL> --execution_endpoint <EXECUTION_ENDPOINT_URL>Example:
git clone https://github.com/stafiprotocol/eth-ejector.git
cd eth-ejector
git checkout v0.3.2
make build
./build/eth-ejector start --keys_dir /home/stafi/eth2.0/validator_keys --consensus_endpoint https://beacon.zhejiang.ethpandaops.io  --execution_endpoint https://rpc.zhejiang.ethpandaops.io
Exit
Assuming you are using Prysm, voluntarily exiting your validator from the Ethereum network is a one time command using the prysmctl tool. Note that this operation was previously facilitated by a command exposed by the Prysm validator client, and can still be accessed that way. At a high level, you'll follow these steps to exit your validator:
- Ensure that you have access to a fully synced beacon node.
- Issue the validator exit command to your validator and allow the beacon node to access to your validator keys through the
--wallet-dirflag or web3signer and the--beacon-rpc-providerflag (examples provided below). - Select the account(s) that should be exited. This step can be skipped by specifying the account(s) via the --public-keys flag when issuing the validator exit command.
- Confirm your understanding of the consequences of exiting your validator by typing Exit my validator when prompted.
More details please follow this exit doc (opens in a new tab).
Reasons for staking failure
- The uploaded file is invalid.
- Insufficient ETH in the pool:
- For Solo Validator: ETH amount in the pool < 20Pubkey amount.
- For Trusted Validator: ETH amount in the pool < 31Pubkey amount.
- The pubkey of the Trusted Validator can not be uploaded for the solo Validator.
- Trusted Validator and Solo Validator pubkeys could not be staked at the same time.